There is a specific moment in every baker’s life when they pull a bubbling, golden-brown apple pie from the oven and wonder why the filling turned into a soupy mess, or why the bottom crust never cooked through. For many home cooks in the United States, the pursuit of the perfect classic apple pie feels like chasing a family legend. You have the recipe, you have the apples, but the result often falls short of the ideal.
If you have ever felt frustrated by a soggy bottom or filling that runs all over the plate, you are not alone. This article is designed to walk you through the traditional American apple pie without the guesswork. You will learn the techniques that ensure a crisp crust, a perfectly spiced filling, and a dessert that looks as good as it tastes. Whether you are baking for Thanksgiving or simply a Sunday evening, the goal here is to give you confidence through practical, experience-based advice.
Why Apple Pie Holds a Special Place in American Kitchens
Apple pie is often referred to as the quintessential American dessert, but its reputation is built on more than nostalgia. Historically, apple trees thrived across the northern and mid-Atlantic colonies, making apples one of the most accessible fruits for early settlers. Over generations, this practicality turned into tradition.
The problem many modern bakers face is that they try to rush the process. They assume that a store-bought crust combined with a quick toss of apples will yield the same result as a slow, careful preparation. The reason apple pie can be tricky is that apples release a significant amount of moisture during baking. If the crust is not prepared to handle that moisture, you end up with a dessert that tastes fine but lacks the structural integrity of a great pie.
The practical solution lies in understanding the science of both the dough and the fruit. A traditional American apple pie relies on a balance of fat, flour, and ice water to create a flaky barrier. When you respect the resting time for the dough and the preparation of the apples, the pie transforms from a simple dessert into a reliable staple. For example, bakers in Vermont and upstate New York often let their dough rest in the refrigerator for at least two hours—a simple step that prevents the dreaded shrinkage during baking.
Choosing the Right Apples for Structure and Flavor
One of the most common mistakes in apple pie making is using only one type of apple. Many home cooks grab a bag of Red Delicious or Gala because they taste sweet out of hand, but these apples break down into mush when exposed to high heat. The problem here is a lack of structural integrity.
The reason you need a mix is that different apples serve different purposes. Some apples, like Granny Smith, hold their shape well and provide a sharp tartness that cuts through the sugar. Others, like Honeycrisp or Braeburn, offer sweetness and a firm texture that adds complexity. If you use only soft apples, the filling collapses; if you use only hard, tart apples, the pie can be too sour.
The practical solution is to use a blend. A classic combination used by bakeries across the Midwest is a mix of Granny Smith for structure, Honeycrisp for sweetness, and a few Golden Delicious for a creamy texture. Aim for about six to seven medium apples to fill a standard nine-inch pie plate. When you slice them, aim for uniform thickness—about a quarter-inch thick—so they cook evenly. Real-life example: In Pennsylvania Dutch country, it is common to see bakers toss their sliced apples with a bit of lemon juice and let them sit for 15 minutes before draining off the excess liquid. This simple maceration step concentrates the apple flavor and prevents a watery pie.
The Art of the All-Butter Crust
For many Americans, the crust is the defining feature of a great apple pie. A crust that is tough or flavorless can ruin even the best filling. The problem is often that bakers overwork the dough, which develops gluten and results in a hard, cracker-like texture.
The reason butter is the preferred fat in traditional American pie dough is that it contains milk solids and water. As the butter melts in the oven, the water turns to steam, creating those delicate, flaky layers. Shortening can be easier to handle, but it does not provide the same depth of flavor or that golden-brown color that makes a pie visually appealing.

The practical solution is to keep everything cold. Your butter should be straight from the refrigerator, cut into small cubes, and your water should be ice cold. When you mix the flour, salt, and butter, work quickly until the butter pieces are about the size of small peas. You want visible chunks of butter in the dough; those chunks are what will create the flaky layers. Add the ice water one tablespoon at a time until the dough just comes together when pinched.
A real-life example comes from bakers in the Pacific Northwest who often use a combination of pastry flour and all-purpose flour to achieve tenderness without sacrificing structure. Once your dough is formed, divide it into two discs, wrap them tightly, and refrigerate for at least an hour—or overnight if you plan ahead. This resting period allows the gluten to relax and the fats to firm up, ensuring your dough rolls out without shrinking back.
Building Flavor with Spices and Sweeteners
The filling of a classic apple pie should taste like apples, not just sugar. A frequent problem in modern recipes is that they rely too heavily on cinnamon and white sugar, creating a one-dimensional flavor profile.
The reason depth matters is that apples have a subtle flavor that can easily be overpowered. Traditional American recipes from the early 20th century often used a blend of spices to complement the fruit rather than mask it. This is where the concept of balance comes into play.


The practical solution is to build a spice mix that includes cinnamon for warmth, but also a pinch of nutmeg for earthiness, a dash of allspice for complexity, and a small amount of salt to enhance the sweetness. For the sweetener, consider using a combination of granulated sugar and light brown sugar. The brown sugar adds a hint of molasses that mimics the caramelization you want on the edges of the pie.
When you combine your sliced apples with the sugar, spices, a squeeze of lemon juice, and a few tablespoons of flour or cornstarch, let the mixture sit for 10 minutes. This allows the apples to release their initial juice, which you can then toss again to ensure even coating. In many traditional kitchens in the South, bakers add a tablespoon of unsalted butter directly on top of the filling before sealing the top crust. This butter melts into the apples, enriching the sauce and contributing to that glossy, bubbling appearance.
The Importance of Bottom Crust Pre-Cooking
If there is one secret that separates average apple pies from exceptional ones, it is attention to the bottom crust. The problem is that the bottom crust sits directly on a hot surface, but it often does not cook long enough to become crisp because the cold, wet filling slows down the cooking process.
The reason this happens is that most home bakers simply pour the filling into the raw bottom crust and bake. By the time the filling is bubbling, the bottom dough has only just started to cook, resulting in a pale, soggy foundation.
The practical solution is to pre-cook the bottom crust partially, a technique known as blind baking, or to use a hot baking sheet. For a double-crust pie, you can line your pie plate with the dough, place it in the refrigerator to chill again, and then bake it for 12 to 15 minutes with pie weights before adding the filling. This creates a barrier that remains crisp even after the second bake.
If you prefer not to blind bake, an easier method is to place your pie plate on a preheated baking sheet in the oven. The direct heat from the baking sheet jumpstarts the cooking process of the bottom crust. This technique is widely used by bakeries in the Northeast, where the goal is a pie that holds its shape when sliced. Additionally, brushing the bottom crust with an egg wash or a thin layer of melted butter before adding the filling creates a seal that prevents the juice from soaking in.
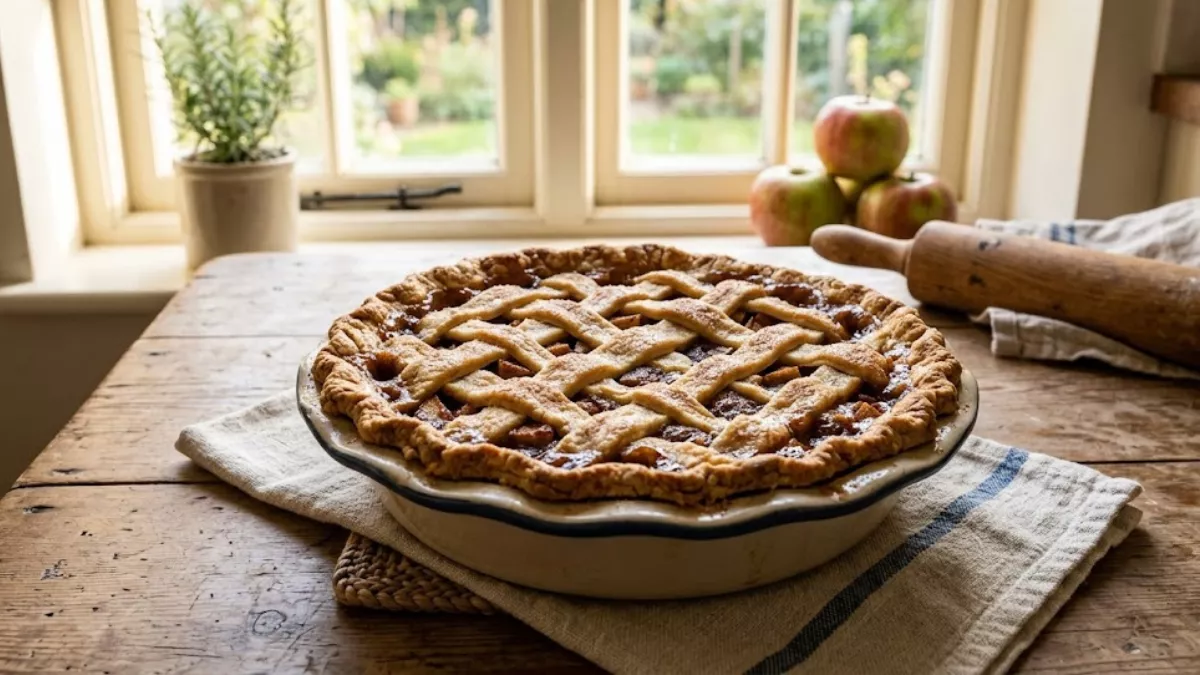
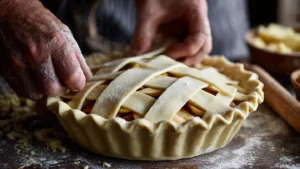
Lattice Tops and Ventilation
The top crust is often the most decorative part of the pie, but it serves a functional purpose as well. A solid top crust without enough vents can trap steam, leading to a filling that boils over the sides or a top that becomes gummy.
The reason ventilation is critical is that the moisture from the apples needs an escape route. If the steam cannot release, it condenses back onto the crust, creating a soggy texture. A lattice top, where strips of dough are woven together, provides maximum ventilation and a classic American aesthetic.
The practical solution is to master a simple lattice pattern. Roll out your second disc of dough and cut it into strips about one inch wide. Weave the strips over and under each other directly over the filling. This allows steam to escape from dozens of small gaps, ensuring the top crust browns evenly and the filling reduces properly.
For bakers who prefer a solid top crust, be sure to cut at least four to five large slits in the center. A real-life example from diners across the country involves brushing the top crust with heavy cream and sprinkling it with coarse sugar before baking. This adds a delicate crunch and a beautiful sparkle that makes the pie ready for a magazine cover, but also helps the crust crisp up beautifully.
Resting Before Slicing
Perhaps the most difficult part of making a classic apple pie is the waiting period after it comes out of the oven. The problem is that the pie looks so perfect and smells so inviting that it is tempting to slice into it immediately.
The reason you must resist this urge is thermodynamics. When the pie is fresh from the oven, the filling is essentially boiling. If you cut it while it is that hot, the juices will run out like a river, leaving you with dry apples and a puddle on the plate. The starches or thickeners in the filling need time to set as they cool.
The practical solution is patience. Let the pie cool on a wire rack for a minimum of three to four hours. Ideally, you want it to reach room temperature. This waiting period allows the filling to thicken to a jammy consistency that holds its shape when sliced.
Real-life example: In many traditional American households, apple pie is baked the day before it is served. This not only makes holiday hosting easier, but it also gives the flavors time to meld together. The next day, the pie can be warmed gently in a 300°F oven for 10 to 15 minutes if you prefer it warm, but the structure will remain intact because it had time to cool completely first.
Serving and Storage Tips
A classic apple pie is best enjoyed with company, but knowing how to store leftovers ensures you get to enjoy it for days. The problem is that refrigeration can sometimes dull the flavor of the crust, making it feel stale.
The reason the crust changes texture in the fridge is that the moisture from the filling slowly migrates into the dough. To combat this, store the pie uncovered in a cool, dry spot if you plan to eat it within 24 hours. For longer storage, cover it loosely with foil and place it in the refrigerator.
The practical solution for reviving a day-old pie is to reheat individual slices in a toaster oven or a conventional oven. A few minutes at 350°F will crisp the crust back up and warm the filling without drying it out. Avoid the microwave if possible, as it makes the crust chewy.
When it comes to serving, a scoop of vanilla bean ice cream or a dollop of lightly sweetened whipped cream is traditional. The cold dairy contrasts beautifully with the warm spices and buttery crust. This pairing has been a staple in American diners from the East Coast to the West Coast for generations.
Conclusion
Making a classic apple pie is one of the most rewarding skills a home baker can develop. It requires a respect for ingredients, a bit of patience, and an understanding that small techniques—like chilling the dough, mixing apple varieties, and allowing the pie to rest—make a significant difference. By focusing on the structure of the crust and the balance of the filling, you move beyond simply following a recipe and start baking with confidence.
The next time you find yourself in the kitchen with a pile of apples and a rolling pin, remember that great pie is not about perfection but about understanding the process. Whether you are serving it at a family gathering in Texas or bringing it to a neighbor in Oregon, the warmth and comfort of a well-made apple pie are universally appreciated. Take your time, trust your hands, and enjoy the tradition.
FAQs
What is the best apple for a classic American apple pie?
A blend of firm, tart apples like Granny Smith combined with sweeter, crisp varieties like Honeycrisp or Braeburn is ideal. This combination provides structure, flavor balance, and prevents the filling from becoming mushy.
How do I prevent the bottom crust from getting soggy?
To avoid a soggy bottom, preheat a baking sheet in the oven and place your pie directly on it. This provides immediate heat to the bottom crust. Alternatively, blind bake the bottom crust for 10 to 12 minutes before adding the filling.
Should I cook the apple filling before putting it in the pie?
While not strictly necessary, some bakers prefer to cook the apples slightly on the stovetop to reduce moisture. This ensures a thicker filling and helps prevent a gap between the top crust and the apples as they shrink during baking.
How long should apple pie cool before slicing?
Apple pie needs at least three to four hours to cool completely to room temperature. This resting period allows the filling to set properly, ensuring the slices hold their shape and do not run out onto the plate.