If you’ve ever tried making a lamington cake at home, you might have faced a common issue—it looks simple, but the final result doesn’t match expectations. The sponge turns dry, the chocolate coating gets messy, or the coconut doesn’t stick evenly.
Lamington cake, a classic loved in Australia and increasingly popular in the USA and UK, is known for its soft sponge, rich chocolate coating, and delicate coconut layer. When done right, it’s light, moist, and incredibly satisfying.

In this guide, you’ll learn exactly how to make the perfect lamington cake at home step by step. From choosing the right ingredients to mastering the coating process, everything is broken down into practical, easy-to-follow steps.
Understanding Why Lamington Cake Can Go Wrong
Many home bakers assume lamington is just a basic sponge dipped in chocolate and coconut. That assumption often leads to disappointing results.
The real challenge lies in balance. The sponge must be firm enough to hold its shape, yet soft enough to absorb the chocolate coating. The chocolate mixture needs the right consistency—not too thick, not too runny. And timing matters more than most people realize.
For example, in many U.S. kitchens, people use freshly baked sponge right away. This usually causes the cake to crumble during dipping. The result is uneven coating and broken pieces.


The solution starts with understanding that lamington is a process-driven recipe, not just a list of ingredients.
Choosing the Right Ingredients for Best Results
A perfect lamington begins with simple but carefully selected ingredients. Using the wrong type or proportion can affect texture and taste.
Start with basic pantry staples: all-purpose flour, eggs, sugar, butter, and milk. These create a classic sponge base that works well in most American kitchens.
For the coating, use unsweetened cocoa powder, powdered sugar, butter, and a little milk or water. This combination creates a smooth, glossy chocolate mixture that sticks well to the sponge.


Desiccated coconut is ideal for the outer layer. It provides the authentic texture lamington is known for. In the U.S., you can easily find this in baking aisles or substitute with finely shredded coconut if needed.
A real-life example: many home bakers in New York prefer adding a small layer of raspberry jam between sponge layers. This adds moisture and a subtle flavor contrast without complicating the process.
Step 1: Bake a Firm but Soft Sponge Cake
The first step is baking the sponge correctly. This is where most problems begin if not done properly.
Preheat your oven to 350°F (175°C). Grease and line a square baking pan to ensure easy removal. Beat eggs and sugar until light and fluffy—this step creates air in the batter, which helps the cake rise.


Gently fold in sifted flour and a small amount of melted butter or milk. Avoid overmixing, as this can make the sponge dense.
Bake for about 20–25 minutes until the top is golden and a toothpick comes out clean.
Here’s the key insight: once baked, do not use the sponge immediately. Let it cool completely, then refrigerate it for a few hours or overnight. This firms up the structure, making it easier to cut and dip.
Step 2: Cut the Cake into Even Pieces
After chilling, remove the sponge and cut it into even squares. Uniform pieces help ensure consistent coating and presentation.
Use a sharp knife and clean it between cuts to avoid crumbs sticking to the blade. Typically, 2-inch squares work well for home baking.
Many beginners rush this step and end up with uneven pieces. This creates problems later when dipping, as some pieces absorb more chocolate than others.
In a typical home setting in the U.S., placing the cake on a cutting board and marking light guide lines before cutting can improve accuracy.
Step 3: Prepare the Chocolate Coating Properly
The chocolate coating is what gives lamington its signature flavor. Getting the consistency right is essential.
Mix cocoa powder, powdered sugar, and melted butter in a bowl. Gradually add warm milk or water while stirring until you get a smooth, pourable mixture.
The coating should be thin enough to spread easily but thick enough to stick to the cake without dripping excessively.
A common mistake is making the mixture too thick. This causes clumps and uneven coverage. On the other hand, a very thin mixture won’t coat properly.
A practical tip: keep the chocolate mixture slightly warm during the process. This maintains a smooth texture and makes dipping easier.
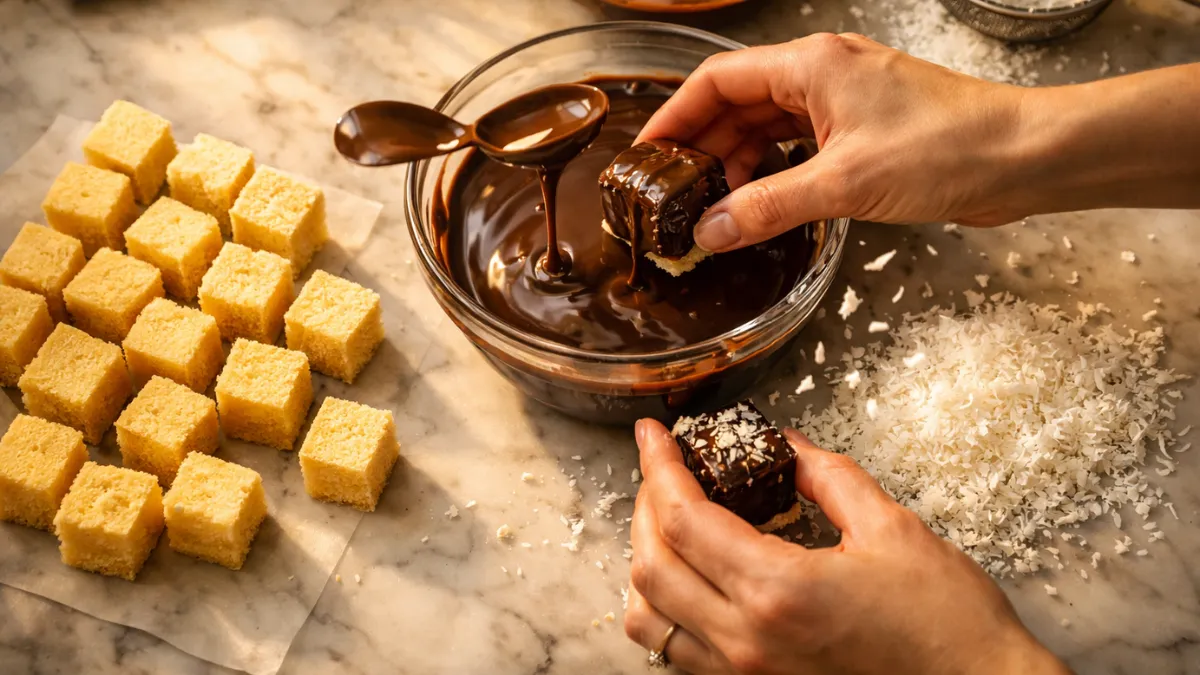
Step 4: Dip Each Cake Piece Carefully
Now comes the most delicate step—dipping the sponge into the chocolate.
Use a fork or two skewers to hold each piece. Gently dip it into the chocolate coating, ensuring all sides are covered.
Avoid soaking the cake for too long. A quick dip is enough to coat the surface without making it soggy.
Place the coated piece on a rack for a few seconds to allow excess chocolate to drip off. This prevents pooling and keeps the final texture balanced.
In many home kitchens, placing parchment paper underneath the rack makes cleanup easier and keeps the process organized.
Step 5: Coat with Coconut Immediately
After dipping in chocolate, roll the cake piece in desiccated coconut right away. Timing is important here.
If you wait too long, the chocolate coating will start to set, and the coconut won’t stick properly.
Use a shallow bowl filled with coconut and gently roll the cake until all sides are covered. Press lightly to ensure even coverage.
A useful tip from experienced bakers: use separate hands for chocolate and coconut. This keeps the process clean and prevents clumping.
Step 6: Let the Lamingtons Set Properly
Once coated, place the lamingtons on a tray lined with parchment paper. Allow them to set at room temperature.
This step helps the chocolate coating firm up and bind the coconut layer to the cake.
Avoid stacking them too soon, as this can damage the coating. Give them at least 30–60 minutes to set completely.
In warmer climates, such as parts of the southern United States, placing them in a cool room or lightly refrigerated space can help maintain structure.
Step 7: Optional Filling for Extra Flavor
While traditional lamingtons are simple, adding a filling can elevate the experience.
Slice each sponge square in half and spread a thin layer of raspberry jam or whipped cream before dipping. This adds moisture and a pleasant contrast to the chocolate coating.
In many modern kitchens, especially in the UK and USA, this variation is becoming more popular for special occasions.
However, keep the filling light. Too much can make the cake unstable during dipping.
Common Mistakes and How to Avoid Them
Even with the right steps, a few common mistakes can affect your results.
Using fresh sponge instead of chilled cake often leads to crumbling. Always allow time for the cake to firm up.
Another issue is uneven chocolate coating. This usually happens when the mixture is too thick or not maintained at the right temperature.
Over-soaking the cake can also make it too soft. A quick dip is enough.
Finally, rushing the coconut coating step can result in patchy coverage. Work efficiently but carefully.
By understanding these small details, you can significantly improve your final outcome.
Also Read:
Easy Homemade Sponge Cake Recipe for Beginners
How to Bake Moist Cakes Without Dry Edges
Simple Dessert Ideas Using Coconut
Conclusion
Making the perfect lamington cake at home is less about complexity and more about precision. Each step—from baking the sponge to coating it properly—plays a role in the final result.
When you understand the process, the recipe becomes much easier to manage. You’ll get a cake that is soft, evenly coated, and visually appealing.
Whether you’re baking for a weekend treat or trying something new in your kitchen, lamington cake offers a satisfying and rewarding experience. With practice, you’ll find your rhythm and create consistently great results.
FAQ’s
What type of sponge is best for lamington cake?
A firm yet soft sponge works best. It should hold its shape during dipping but still be light and airy inside.
Can I make lamington cake without coconut?
Yes, but coconut is a key part of the traditional recipe. You can substitute with finely chopped nuts if needed.
Why is my lamington cake falling apart?
This usually happens when the sponge is too fresh or soft. Chilling the cake before cutting helps prevent this issue.
Can I store lamington cake for later?
Yes, you can store it in an airtight container for up to 2–3 days at room temperature or refrigerate it for longer freshness.